This build is uses WASM for best possible performance and is designed to be (more or less) a drop-in replacement for the previous jsartoolkit5. Some parts of the previous API have been refactored to implement an async interface instead of the previous callback based interface.
Installation
Install the module via NPM:
npm install artoolkit5-js
The module is built in UMD format and can be used in different environments:
This will create an ARController instance expecting source images of dimensions 640×480. The second parameter is a camera definition file which describes the characteristics of your image / video input device. If you don’t know which file to use just use the default camera_para.dat included with this repository.
There is an alternative initializer initWithImage available as convenience method which accepts an HTMLImageElement or HTMLVideoElement instead of width / height. However this obviously only works in Browser (or MonkeyPatched) environments.
2) Add markers you want to track
Next you need to load the marker files to track with your controller. In this example the pattern file for the “Hiro” marker is loaded:
// track with 60 FPS
const FPS = 60;

setInterval(() => {

  const result = controller.detectMarker();
  if(result !== 0) {
    // ARToolkit returning a value !== 0 means an error occured
    console.log('Error detecting markers');
    return;
  }

  // get the total number of detected markers in frame
  const markerNum = controller.getMarkerNum();
  let hiroFound = false;

  // check if one of the detected markers is the "Hiro" marker
  for(let i = 0; i < markerNum; i++) {
    const markerInfo = controller.getMarker(i);
    if(markerInfo.idPatt == hiroMarkerId) {
      // store the marker ID from the detection result
      hiroFound = i;
      break;
    }
  }

  if(hiroFound !== false) {
	console.log("You have found the HIRO marker");
  }

}, 1000 / FPS);
Other ARToolkit API methods
You can access all public ARToolkit methods and class constants like this:
  // for the full API documentation see
  // https://github.com/artoolkit/artoolkit5
  artoolkit.detectMarker( ... );

  console.log(artoolkit.AR_LOG_LEVEL_DEBUG);
Current limitations
Due to time constraints this build does not implement NFT and multimarker support (yet). Adding support for both should be trivial though as all the groundwork has already been laid out. I will implement it once time allows but PRs are of course welcome!
⚠️ This repository is archived. Current development for DripDash is here.
DripDash is an all-in-one aquaponics monitoring, control and data logging tool,
built with Vue on Node.js.
📝 About DripDash
Aquaponics is hard. It’s a three-way ecosystem with plants, bacteria and fish
living in balanced symbiosis. DripDash, along with the rest of the unPhone project,
aims to make aquaponics easier.
DripDash is constructed in three parts:
The frontend, constructed with Vue.js for control and monitoring.
The backend, integrating express, the database and GraphQL API.
The collector, a separate endpoint for communicating WaterElf devices.
For more detailed instructions, check out the Documentation.
# Assuming nodejs and git are already present.# 1 - Clone the repository.
git clone git@gitlab.com:unphone/dripdash.git
cd dripdash
# 2 - Install dependencies.
npm install
# 3 - Connect the database. (Set the connection string in prisma/.env)
cp prisma/.env.example prisma/.env
# 3.1 - Create the required structure in the database.
npx prisma migrate up --experimental
# 4a - Start for development.
npm run serve
# 4b - Alternatively, start for production.
npm run build
npm run production
🪲 Issues & Bugs
Found a bug? Feel free to raise an issue or submit a PR and we’ll take a look at it.
A simple TypeScript HTTP client with Promise-based API and advanced filtering support
Basic usage
Simple GET request with string response:
importexpectfrom'ceylon';import{Response,Request,newHttpClient}from'typescript-http-client'(async()=>{// Get a new clientconstclient=newHttpClient()// Build the requestconstrequest=newRequest('https://jsonplaceholder.typicode.com/todos/1',{responseType: 'text'})// Execute the request and get the response body as a stringconstresponseBody=awaitclient.execute<string>(request)expect(responseBody).toExist().toBeA('string').toBe(`{ "userId": 1, "id": 1, "title": "delectus aut autem", "completed": false}`)})()
Typed response:
importexpectfrom'ceylon';import{Response,Request,newHttpClient}from'typescript-http-client'classTodo{completed: booleanid: numbertitle: stringuserId: number}(async()=>{// Get a new clientconstclient=newHttpClient()// Build the requestconstrequest=newRequest('https://jsonplaceholder.typicode.com/todos/1')// Execute the request and get the response body as a "Todo" objectconsttodo=awaitclient.execute<Todo>(request)expect(todo).toExist().toBeA('object')expect(todo.userId).toBe(1)})()
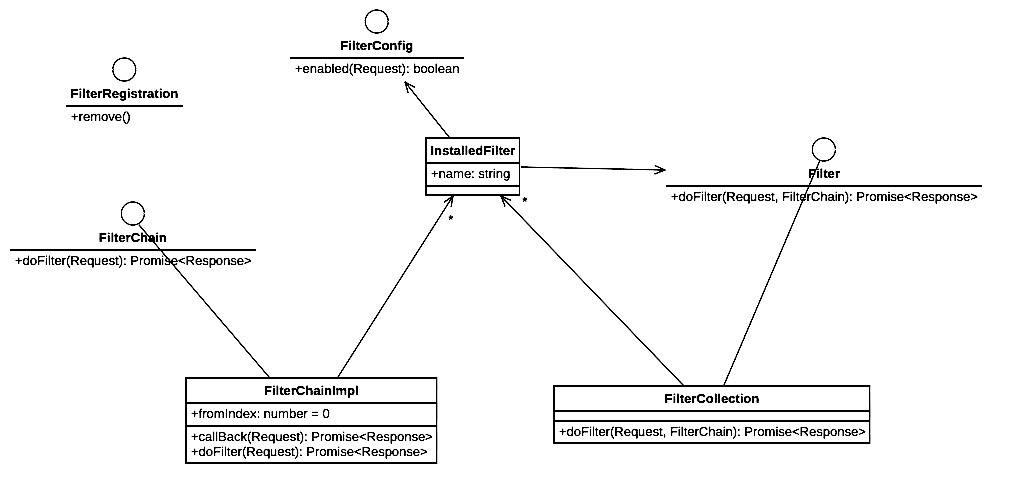
Filters
Multiple filters can be added to the httpClient, in a certain order, forming a chain of filters.
Filters can be used to:
Alter any request property (headers, url, body, etc…)
Alter any response property (headers, body, etc…)
Short-circuit the chain by returning a custom response without proceeding with the HTTP call, allowing for example for client-side caching.
Intercept some or all calls for debugging/logging purposes
Filters must implement the Filter interface and implement the doFilter method:
The request parameter contains the request (possibly already modified by previous filters) and can be modified by the filter (or ignored)
The filterChain parameter represents the chain of filters following the current filter
Filter full example : Transform the response body:
This example transforms the fetched Todos and modify their title
importexpectfrom'ceylon';import{Response,Request,Filter,FilterChain,newHttpClient}from'typescript-http-client'classTodo{completed: booleanid: numbertitle: stringuserId: number}// Transform Todos : Alter titleclassTodoTransformerimplementsFilter<Todo,Todo>{asyncdoFilter(call: Request,filterChain: FilterChain<Todo>): Promise<Response<Todo>>{constresponse=awaitfilterChain.doFilter(call)consttodo=response.bodytodo.title='Modified title'returnresponse}}(async()=>{// Get a new clientconstclient=newHttpClient()// Add our Todo tranformer filterclient.addFilter(newTodoTransformer(),'Todo transformer',{// Only apply to GET request with URL starting with // 'https://jsonplaceholder.typicode.com/todos/'enabled(call: Request): boolean{returncall.method==='GET'&&call.url.startsWith('https://jsonplaceholder.typicode.com/todos/')}})// Build the requestconstrequest=newRequest('https://jsonplaceholder.typicode.com/todos/1')// Execute the request and get the response body as an objectconsttodo=awaitclient.execute<Todo>(request)expect(todo).toExist().toBeA('object')expect(todo.userId).toBe(1)expect(todo.title).toBe('Modified title')})()
Hierarchy of Filters
Testing
In the tests, you need to first in indicate which name space you are testing, and then precise which method. Both using describe. The entity tested is the first argument of describe.
The second argument of describe, is a function. In the function, you need another function called: it. This function also takes two arguments. The first is a string that is usefull only for future developpers (does nothing in the code) saying what result we expect from our test, and the second is once again a method, ending with an assert this time. This last method is the test.
A simple TypeScript HTTP client with Promise-based API and advanced filtering support
Basic usage
Simple GET request with string response:
importexpectfrom'ceylon';import{Response,Request,newHttpClient}from'typescript-http-client'(async()=>{// Get a new clientconstclient=newHttpClient()// Build the requestconstrequest=newRequest('https://jsonplaceholder.typicode.com/todos/1',{responseType: 'text'})// Execute the request and get the response body as a stringconstresponseBody=awaitclient.execute<string>(request)expect(responseBody).toExist().toBeA('string').toBe(`{ "userId": 1, "id": 1, "title": "delectus aut autem", "completed": false}`)})()
Typed response:
importexpectfrom'ceylon';import{Response,Request,newHttpClient}from'typescript-http-client'classTodo{completed: booleanid: numbertitle: stringuserId: number}(async()=>{// Get a new clientconstclient=newHttpClient()// Build the requestconstrequest=newRequest('https://jsonplaceholder.typicode.com/todos/1')// Execute the request and get the response body as a "Todo" objectconsttodo=awaitclient.execute<Todo>(request)expect(todo).toExist().toBeA('object')expect(todo.userId).toBe(1)})()
Filters
Multiple filters can be added to the httpClient, in a certain order, forming a chain of filters.
Filters can be used to:
Alter any request property (headers, url, body, etc…)
Alter any response property (headers, body, etc…)
Short-circuit the chain by returning a custom response without proceeding with the HTTP call, allowing for example for client-side caching.
Intercept some or all calls for debugging/logging purposes
Filters must implement the Filter interface and implement the doFilter method:
The request parameter contains the request (possibly already modified by previous filters) and can be modified by the filter (or ignored)
The filterChain parameter represents the chain of filters following the current filter
Filter full example : Transform the response body:
This example transforms the fetched Todos and modify their title
importexpectfrom'ceylon';import{Response,Request,Filter,FilterChain,newHttpClient}from'typescript-http-client'classTodo{completed: booleanid: numbertitle: stringuserId: number}// Transform Todos : Alter titleclassTodoTransformerimplementsFilter<Todo,Todo>{asyncdoFilter(call: Request,filterChain: FilterChain<Todo>): Promise<Response<Todo>>{constresponse=awaitfilterChain.doFilter(call)consttodo=response.bodytodo.title='Modified title'returnresponse}}(async()=>{// Get a new clientconstclient=newHttpClient()// Add our Todo tranformer filterclient.addFilter(newTodoTransformer(),'Todo transformer',{// Only apply to GET request with URL starting with // 'https://jsonplaceholder.typicode.com/todos/'enabled(call: Request): boolean{returncall.method==='GET'&&call.url.startsWith('https://jsonplaceholder.typicode.com/todos/')}})// Build the requestconstrequest=newRequest('https://jsonplaceholder.typicode.com/todos/1')// Execute the request and get the response body as an objectconsttodo=awaitclient.execute<Todo>(request)expect(todo).toExist().toBeA('object')expect(todo.userId).toBe(1)expect(todo.title).toBe('Modified title')})()
Hierarchy of Filters
Testing
In the tests, you need to first in indicate which name space you are testing, and then precise which method. Both using describe. The entity tested is the first argument of describe.
The second argument of describe, is a function. In the function, you need another function called: it. This function also takes two arguments. The first is a string that is usefull only for future developpers (does nothing in the code) saying what result we expect from our test, and the second is once again a method, ending with an assert this time. This last method is the test.
In production mode is the macro output cached in default application’s cache storage.
It can be changed in the configuration using the boolean cache key.
Configuration
Default configuration, which usually doesn’t need to be changed:
# app/config/config.neonassetMacro:
# Cache generated outputcache: %productionMode%# Path to revision manifest or asset => revision pairs,# if set, the autodetection is switched offmanifest: null # %wwwDir%/assets/manifest.json# File names for automatic detection of revision manifestautodetect:
- assets.json
- busters.json
- versions.json
- manifest.json
- rev-manifest.json# Absolute path to assets dirassetsPath: %wwwDir%/ # %wwwDir%/assets# Public path to "assetsPath"publicPath: / # /assets# Action if missing asset file: exception, notice, or ignoremissingAsset: notice# Action if missing manifest file: exception, notice, or ignoremissingManifest: notice# Action if missing asset revision in manifest: exception, notice, or ignoremissingRevision: notice# Default format, can be changed in macro using "format => ..."format: '%%url%%'# character % is escaped by %%
ManifestService
It is also possible to access the manifest from your code using Webrouse\AssetMacro\ManifestService (from DI container).
Provisions K3s nodes and is able to build a cluster from multiple nodes.
You can use the k3s module to template the necessary cloudinit files for creating a K3s cluster node.
Modules for OpenStack and Hetzner hcloud that bundle all necessary resources are available.
Supported Cloud Providers
OpenStack
Hetzner Cloud (hcloud)
Modules
k3s
This module provides the templating of the user_data for use with cloud-init.
With this module a single K3s node can be deployed with OpenStack. It internally uses the k3s module. Depending on the supplied parameters the node will initialize a new cluster or join an existing cluster as a server or agent.
module"server" {
source="git::https://github.com/nimbolus/tf-k3s.git//k3s-openstack"name="k3s-server"image_name="ubuntu-20.04"flavor_name="m1.small"availability_zone="ex"keypair_name="keypair"network_id=var.network_idsubnet_id=var.subnet_idsecurity_group_ids=[module.secgroup.id]
cluster_token="abcdef"k3s_args=[
"server",
"--disable", "traefik",
"--node-label", "az=ex1",
# if using bootstrap-auth include"--kube-apiserver-arg", "enable-bootstrap-token-auth",
]
bootstrap_token_id="012345"bootstrap_token_secret="0123456789abcdef"
}
k3s-openstack/security-group
The necessary security-group for the K3s cluster can be deployed with this module.
With this module a single K3s node can be deployed with hcloud. It internally uses the k3s module. Depending on the supplied parameters the node will initialize a new cluster or join an existing cluster as a server or agent.
module"server" {
source="git::https://github.com/nimbolus/tf-k3s.git//k3s-hcloud"name="k3s-server"keypair_name="keypair"network_id=var.network_idnetwork_range=var.ip_rangecluster_token="abcdef"k3s_args=[
"server",
"--disable", "traefik",
"--node-label", "az=ex1",
# if using bootstrap-auth include"--kube-apiserver-arg", "enable-bootstrap-token-auth",
]
bootstrap_token_id="012345"bootstrap_token_secret="0123456789abcdef"
}
bootstrap-auth
To access the cluster an optional bootstrap token can be installed on the cluster. To install the token specify the parameters bootstrap_token_id and bootstrap_token_secret on the server that initializes the cluster.
For ease of use the provider nimbolus/k8sbootstrap can be used to retrieve the CA certificate from the cluster. The provider can also output a kubeconfig with the bootstrap token.
data"k8sbootstrap_auth""auth" {
// depends_on = [module.secgroup] // if using OpenStackserver=module.server1.k3s_external_urltoken=local.token
}
Examples
basic: basic usage of the k3s module with one server and one agent node
ha-hcloud: 3 Servers and 1 Agent with bootstrap token on Hetzner Cloud
ha-openstack: 3 Servers and 1 Agent with bootstrap token on OpenStack
Tests
Basic
cd tests/basic
go test -count=1 -v
OpenStack
cd tests/ha-openstack
cp env.sample .env
$EDITOR .env
source .env
go test -count=1 -v
hcloud
cd tests/ha-hcloud
cp env.sample .env
$EDITOR .env
source .env
go test -count=1 -v
A clone of Product Hunt web built with MongoDB, Express and React.
Available Scripts
In the project directory, you can run:
yarn start
Runs the app in the development mode.
Open http://localhost:3000 to view it in the browser.
yarn test
Launches the test runner in the interactive watch mode.\
yarn build
Builds the app for production to the build folder.
It correctly bundles React in production mode and optimizes the build for the best performance.
The build is minified and the filenames include the hashes.
Your app is ready to be deployed!
yarn eject
Note: this is a one-way operation. Once you eject, you can’t go back!
If you aren’t satisfied with the build tool and configuration choices, you can eject at any time. This command will remove the single build dependency from your project.
Instead, it will copy all the configuration files and the transitive dependencies (webpack, Babel, ESLint, etc) right into your project so you have full control over them. All of the commands except eject will still work, but they will point to the copied scripts so you can tweak them. At this point you’re on your own.
You don’t have to ever use eject. The curated feature set is suitable for small and middle deployments, and you shouldn’t feel obligated to use this feature. However we understand that this tool wouldn’t be useful if you couldn’t customize it when you are ready for it.
📚 Projet de Visualisation de données: “Sapiens – Une brève histoire de l’humanité” 🌍
🔍 Contexte
Jonathan a été profondément marqué par la lecture de Sapiens – Une brève histoire de l’humanité de Yuval Noah Harari. Ce livre fascinant, publié en 2011, retrace l’évolution humaine depuis le paléolithique (il y a environ 2,6 millions d’années) jusqu’à notre ère contemporaine. Passionné par cette lecture, Jonathan a méticuleusement pris des notes détaillées qui serviront de base solide pour notre projet.
Notre démarche consiste à créer notre propre dataset au format JSON. Un exemple est disponible dans le fichier sapiens.json
Type de données : Qualitatives ordinales.
💻 Nous extrairons des données significatives du résumé de Jonathan – des informations simples mais essentielles pour comprendre l’histoire fascinante de notre espèce.
🎯 Objectif
Notre visualisation vise à expliquer et rendre accessible la riche histoire humaine présentée dans Sapiens. Plutôt que de rechercher des tendances ou d’explorer de nouvelles données, nous souhaitons organiser et synthétiser les moments clés du livre pour les présenter de manière claire et compréhensible.
Face à l’abondance d’informations contenues dans l’ouvrage, nous avons décidé de les structurer visuellement pour une meilleure compréhension.
🧠 Notre défi sera de maintenir un fil narratif cohérent tout en mettant en lumière les étapes cruciales qui ont façonné l’humanité. ⏳
📊 Sources & Référence
Nos données sont uniques, directement extraites du livre et soigneusement formatées en JSON par notre équipe. Ce format nous permettra de développer une visualisation efficace et percutante.
Nous avons réalisé nos maquettes sur Figma en nous efforçant de créer des modèles haute fidélité, intégrant déjà les textes définitifs ainsi qu’un prototype fonctionnel (à l’exception de quelques fonctionnalités, comme l’effet de défilement). Voici les liens pour accéder à nos maquettes :
Tester ensuite le ping vers l’extérieur et le ping depuis le client se trouvant sur le réseau host only.
Les deux doivent être OK.
Etape 2 : activer le routage, mettre en place le NAT
Activer le routage :
  $sudo vim /etc/sysctl.conf
  net.ipv4.ip_forward=1
Activer le NAT
eth1 : interface WAN
eth0 : interface LAN
$sudo iptables -A FORWARD -i eth0 -j ACCEPT
$sudo iptables -A FORWARD -o eth0 -j ACCEPT
$sudo iptables -t nat -A POSTROUTING -o eth1 -j MASQUERADE
Vérification
Pinger depuis la station présente sur le réseau interne vers une IP externe
Lister les règles sur le firewal
$sudo iptables -L -v
$sudo iptables -t nat -L -v
Etape 3 : protéger le firewall
Bloquer l’ensemble du trafic destiné au firewall, sauf SSH et PING
$sudo iptables -t filter -A OUTPUT -p icmp -j ACCEPT
$sudo iptables -t filter -A INPUT -p icmp -j ACCEPT
$sudo iptables -t filter -A OUTPUT -p TCP --sport 22 -j ACCEPT
$sudo iptables -t filter -A INPUT -p TCP --dport 22 -j ACCEPT
$sudo iptables -A OUTPUT -o lo -j ACCEPT
$sudo iptables -A INPUT -i lo -j ACCEPT
$sudo iptables -t filter -P INPUT DROP
$sudo iptables -t filter -P OUTPUT DROP
$sudo iptables -t filter -P FORWARD DROP
Firewall PFSENSE
IP LAN : 192.168.49.252
Plage DHCP : 192.168.49.16/28
Définir la machine
FreeBSD64
2 interfaces réseau, une bridge, l’autre host only
2 cores
2048Mo de mémoire
Boot CDROM sur l’iso de Pfsense
Poser le système sur la machine
Booter la VM sur l’ISO d’installation
Boot multi user : enter
I
Change keymap to FR/ISO => accept settings
Quick and easy install : enter
Enter (standard)
Reboot
Booter sur le disque de la machine + configurer
Enter
Vérifier l’attribution des interfaces réseau LAN et WAN
Si interfaces réseau mal attribuées, choix 1) puis réattribuer les interfaces
Choix 2) enter
Laisser l’interface WAN en DHCP
Configurer l’interface LAN :
IP : 192.168.49.252
Mask : 24
Enter (pas de gateway)
Enter (pas d’IPV6)
Enable DHCP : y
DHCP : 192.168.49.17 / 192.168.49.31
Revert to http : si y => choix entre http et https, si n => https uniquement : n
Fin de la configuration réseau minimale, ouvrir un browser sur le réseau host only et poursuivre en allant à l’adresse : https://192.168.49.252
Login : admin
Password : pfsense
Configurer le firewall depuis l’interface Web
Hostname : PFSENSE
Domain : local
Primary DNS Server : vide (conf DHCP WAN)
Secondary DNS Server : vide
Ecran suivant
NTP server: inchangé (on reste sur celui de pfsense pour la démonstration)
Time zone : Paris
Ecran suivant
WAN : on ne change rien
Ecran suivant
LAN : on ne change rien
Ecran suivant
cliquer sur le lien pour accéder à la configuration Web => affichage d’un dashboard system
On arrête la machine et on fait un snapshot en préparation des étapes suivantes.
Gestion des flux
Contrôle de la configuration de base
Désactiver le DHCP intégré à l’outil de virtualisation (VMWARE)
Démarrer le PFSENSE
Démarrer un client sur le réseau host-only
Mettre le client en IP dynamique
Supprimer la configuration de eth0 dans /etc/network/interfaces
reboot (ou redémarrage ntwk et ntwk manager)
/sbin/ifconfig => ok lease dhcp 192.168.49.17
ping adresse IP externe => ok
traceroute adresse IP externe => le flux passe bien par le pfsense
Chiffres
MD5SUM
Pour vérifier l’authenticité d’un fichier, la commande MD5SUM génère un hash du fichier. Il me semble que MD5 n’est pas sûr et qu’il peut y avoir des collisions.