This repository is the portal for the course “Unemployment” taught by Pascal Michaillat at UC Santa Cruz. The course ID is ECON 182. The course portal contains the syllabus, provides a discussion forum, and hosts other course resources.
Lecture handouts – The folder contains handouts distributed in lecture. The handouts are designed to help you develop your research ideas and collect questions about the lecture videos.
Discussion forum – This collaborative discussion forum is designed to get you help quickly and efficiently. You can ask and answer questions, share updates, have open-ended conversations, and follow along course announcements.
Reading material – The folder contains book chapters and articles that may be hard to find online.
Lecture material – The folder contains discussions from lecture.
Presentations – The folder contains all the student presentations given during the quarter, and some presentation templates and examples.
LaTeX code for presentation slides – Complete code to produce a presentation with LaTeX. Just upload the files to Overleaf and start writing your slides!
LaTeX code for research paper – Complete code to produce a research paper with LaTeX. Just upload the files to Overleaf and start writing your paper!
TLDR; Text extraction, transcription, punctuation restoration, translation, summarization and text to speech
The goal of this project is to extend the functionalities of Fabric. I’m particularly interested in building pipelines using utilities like yt as a source and chaining them with the | operator in CI.
However, a major limitation exists: all operations are constrained by the LLM context. For extracting information from books, lengthy documents, or long video transcripts, content may get truncated.
To address this, I started working on adding a summarization step before applying a fabric template, based on the document length.
Additionally, I explored capabilities like transcripting, translating and listening to the pipeline result or saving it as an audio file for later consumption.
Examples
Listen to the condensed summary of a long Youtube video
tp accepts unformatted content, such as automatically generated YouTube transcripts. If the text lacks punctuation, it restores it before further processing, which is necessary for chunking and text-to-speech operations.
Transcription
Converts audio and video files to text using Whisper.
Summarization
The primary aim is to summarize books, large documents, or long video transcripts using an LLM with an 8K context size. Various summarization levels are available:
Extended Bullet Summary (--ebullets, --eb )
Splits text into chunks.
Summarizes all chunks as bullet points.
Concatenates all bullet summaries.
The goal is to retain as much information as possible.
Condensed Bullet Summary (--cbullets, --cb)
Executes as many extended bullet summary phases as needed to end up with a bullet summary smaller than an LLM context size.
Textual Summary (--text, --t)
A simple summarization that does not rely on bullet points.
Translation (--translate, --tr)
Translates the output text to the desired language.
Use two letters code such as en or fr.
Usage
usage: tp [-h] [--ebullets] [--cbullets] [--text] [--lang LANG] [--translate TRANSLATE] [--output_text_file_path OUTPUT_TEXT_FILE_PATH] [text_or_path]

tp (text processing) provides transcription, punctuation restoration, translation and summarization from stdin, text, url, or file path. Supported file formats are: .aiff, .bmp, .cs, .csv, .doc, .docx, .eml, .epub, .flac, .gif, .htm, .html, .jpeg, .jpg, .json, .log, .md, .mkv, .mobi, .mp3, .mp4, .msg, .odt, .ogg, .pdf, .png, .pptx, .ps, .psv, .py, .rtf, .sql, .tff, .tif, .tiff, .tsv, .txt, .wav, .xls, .xlsx

positional arguments:
  text_or_path          plain text; file path; file url

options:
  -h, --help            show this help message and exit
  --ebullets, --eb      Output an extended bullet summary
  --cbullets, --cb      Output a condensed bullet summary
  --text, --t           Output a textual summary
  --lang LANG, --l LANG
                        Forced processing language. Disables the automatic detection.
  --translate TRANSLATE, --tr TRANSLATE
                        Language to translate to
  --output_text_file_path OUTPUT_TEXT_FILE_PATH, --o OUTPUT_TEXT_FILE_PATH
                        output text file path
Text To Speech (tts)
Listen to the pipeline result or save it as an audio file to listen later.
tts can also read text files, automatically detecting their language.
usage: tts.py [-h] [--output_file_path OUTPUT_FILE_PATH] [--lang LANG] [input_text_or_path]

tts (text to speech) reads text aloud or to mp3 file

positional arguments:
  input_text_or_path    Text to read or path of the text file to read.

options:
  -h, --help            show this help message and exit
  --output_file_path OUTPUT_FILE_PATH, --o OUTPUT_FILE_PATH
                        Output file path. If none, read aloud.
  --lang LANG, --l LANG
                        Forced language. Uses language detection if not provided.
constTimer=require('tiny-timer')consttimer=newTimer()timer.on('tick',(ms)=>console.log('tick',ms))timer.on('done',()=>console.log('done!'))timer.on('statusChanged',(status)=>console.log('status:',status))timer.start(5000)// run for 5 seconds
Usage
timer = new Timer({ interval: 1000, stopwatch: false })
Optionally set the refresh interval in ms, or stopwatch mode instead of countdown.
timer.start(duration [, interval]) {
Starts timer running for a duration specified in ms.
Optionally override the default refresh interval in ms.
timer.stop()
Stops timer.
timer.pause()
Pauses timer.
timer.resume()
Resumes timer.
Events
timer.on('tick', (ms) => {})
Event emitted every interval with the current time in ms.
timer.on('done', () => {})
Event emitted when the timer reaches the duration set by calling timer.start().
timer.on('statusChanged', (status) => {})
Event emitted when the timer status changes.
Properties
timer.time
Gets the current time in ms.
timer.duration
Gets the total duration the timer is running for in ms.
timer.status
Gets the current status of the timer as a string: running, paused or stopped.
Open Terminal:
Access the terminal on your Ubuntu server. You can use SSH if you are connecting to a remote server.
Install Git (If Not Already Installed):
Make sure Git is installed on your system. If it is not, you can install it with the following commands:
sudo apt update
sudo apt install git -y
Navigate to the Repository Directory:
Change into the directory of the cloned repository:
cd repo-name
Make the Script Executable:
Find the script file you want to run (e.g., install_deepseek_r1.sh) and make it executable:
chmod +x install_deepseek_r1.sh
Run the Script with Sudo:
Execute the script using sudo to provide administrative privileges:
sudo ./install_deepseek_r1.sh
Wait for the Process to Complete:
The script will start running. Wait until all steps are completed. You will see output in the terminal indicating the progress of the installation.
Verify the Installation:
After the script finishes, you can verify that the DeepSeek-R1 model has been successfully downloaded by running:
ollama list
Running the Model:
To run the DeepSeek-R1 model, use the following command:
ollama run deepseek-r1
Additional Notes:
Ensure you have a stable internet connection during the installation process, as the script will download Ollama and the DeepSeek-R1 model.
If you encounter errors during installation, check the error messages in the terminal for more information about what might have gone wrong.
If the DeepSeek-R1 model is not available, make sure to check the correct model name using the command ollama list.
This repository contains implementations of several Hidden Markov Models (HMM) designed to analyze trading data with various levels of indicator integration and correction methods. The models achieve different performance accuracies, with some versions reaching up to 97% accuracy based on backtesting metrics.
Install dependencies: To ensure proper functionality, install the required packages:
pip install -r requirements.txt
Essential Packages
hmmlearn: For training and evaluating Hidden Markov Models.
numpy, pandas: For data manipulation and numerical operations.
joblib: For saving and loading model files.
scikit-learn: For data preprocessing, scaling, and other utility functions.
matplotlib, seaborn: For data visualization.
Files and Scripts
Main HMM Scripts
The repository includes several Python scripts, each implementing a different HMM with varying configurations of indicators and metrics:
hmm_87%30_ind+_correction.py: Implements an HMM model with 87% accuracy, utilizing 30 indicators and a correction method.
hmm_87%_with_30_indicators.py: HMM model achieving 87% accuracy with 30 indicators.
hmm_88%.py: An HMM model with a slightly higher accuracy of 88%.
hmm_97%_updated_metrics.py: A refined version of the 97% accuracy model, with updated metrics and performance improvements.
hmm_97%.py: A previous version of the 97% accuracy model.
hmm_d_97%.py: Another version of the 97% accuracy model, potentially using different datasets or indicators.
Old Template
oldtemplate.py: The original template for implementing HMM models, which provides a foundational structure for building more advanced models.
Additional Tools and Data Files
liquidity.py: Script that calculates liquidity metrics for trading data.
oos_test.py: Out-of-sample testing script for evaluating model performance on unseen data.
state_transition_diagram: Visualization of the state transitions for the HMM models.
Datasets
The repository includes a few CSV files that contain sample data:
btc.csv, BTC_1H.csv, csv/BTC_2H.csv, etc.: Bitcoin price data at various timeframes.
data/bitcoin_state_changes.csv: Data capturing state transitions for Bitcoin, likely used in the HMM training process.
Model Files
Pre-trained models are saved in the models directory with joblib:
model_hmm_85%_30ind_updated.joblib: A pre-trained HMM model with 85% accuracy using 30 indicators.
model_hmm_88%.joblib: A pre-trained HMM model with 88% accuracy.
model_hmm_98%.joblib: A highly accurate pre-trained HMM model with 98% accuracy.
How to Use the HMM Models
Each model script can be executed directly or used as part of a larger analysis pipeline. For example, to run the hmm_97%_updated_metrics.py model, execute:
python hmm_97%_updated_metrics.py
Results are printed to the console or saved in designated output files for review.
Notes on HMMs and Project Structure
Hidden Markov Models (HMMs) are statistical models that assume the system being modeled is a Markov process with hidden states. In this project, the HMMs are trained on historical trading data, aiming to predict price movements based on various indicators. Each HMM script uses different sets of indicators and configurations to optimize performance. Accuracy percentages indicate the effectiveness of each model based on backtesting metrics.
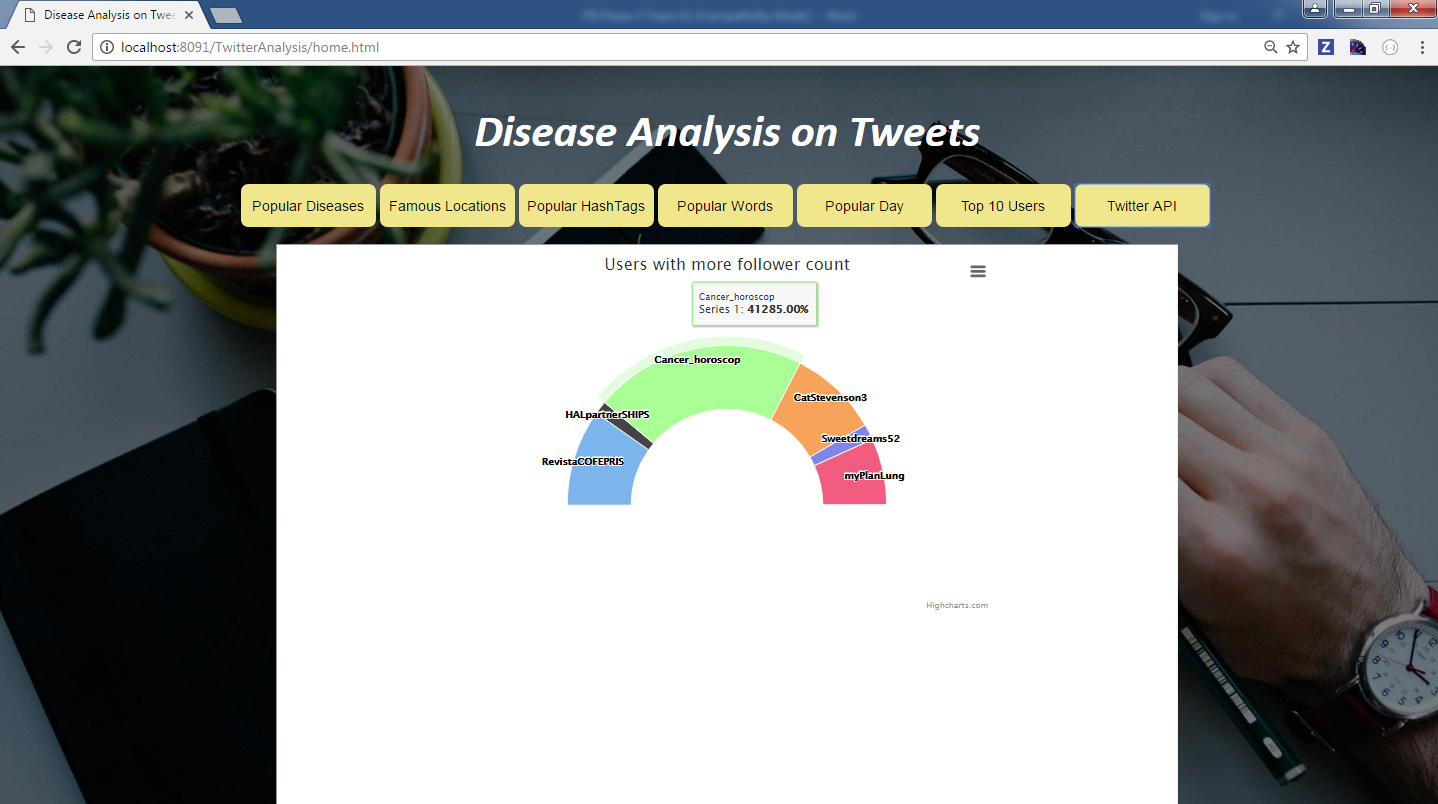
Principles of Big Data Management : Disease Analysis
1. About the Project
We choose ‘Diseases’ as our topic to do big data analysis. Based on twitter tweets, we predicted some interesting analysis on Diseases using thousands of tweets tweeted by different people. First we collected the tweets from twitter API based on some key words related to Disease. After that, we analyzed the data that we have collected. By using the analysis, we written some interesting SQL queries useful to give a proper result for the analysis.
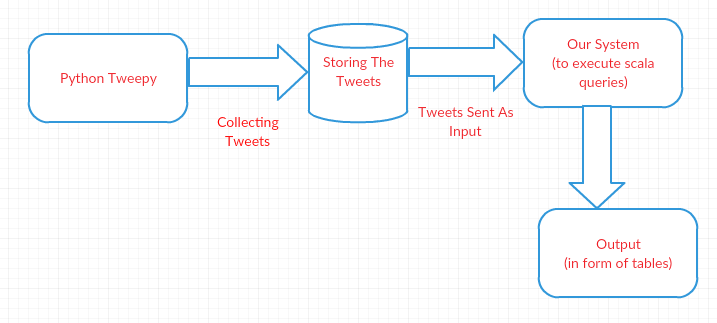
2. System Architecture
First we generated credential for accessing twitter. By using these credentials, we wrote a python program to collect twitter tweets based on keywords related to food. Tweets were stored in a text file in a JSON format. We will give these JSON file to SQL queries for analysis with Spark, Intellij with Scala program with queries.
3. Analyzing Twitter Data
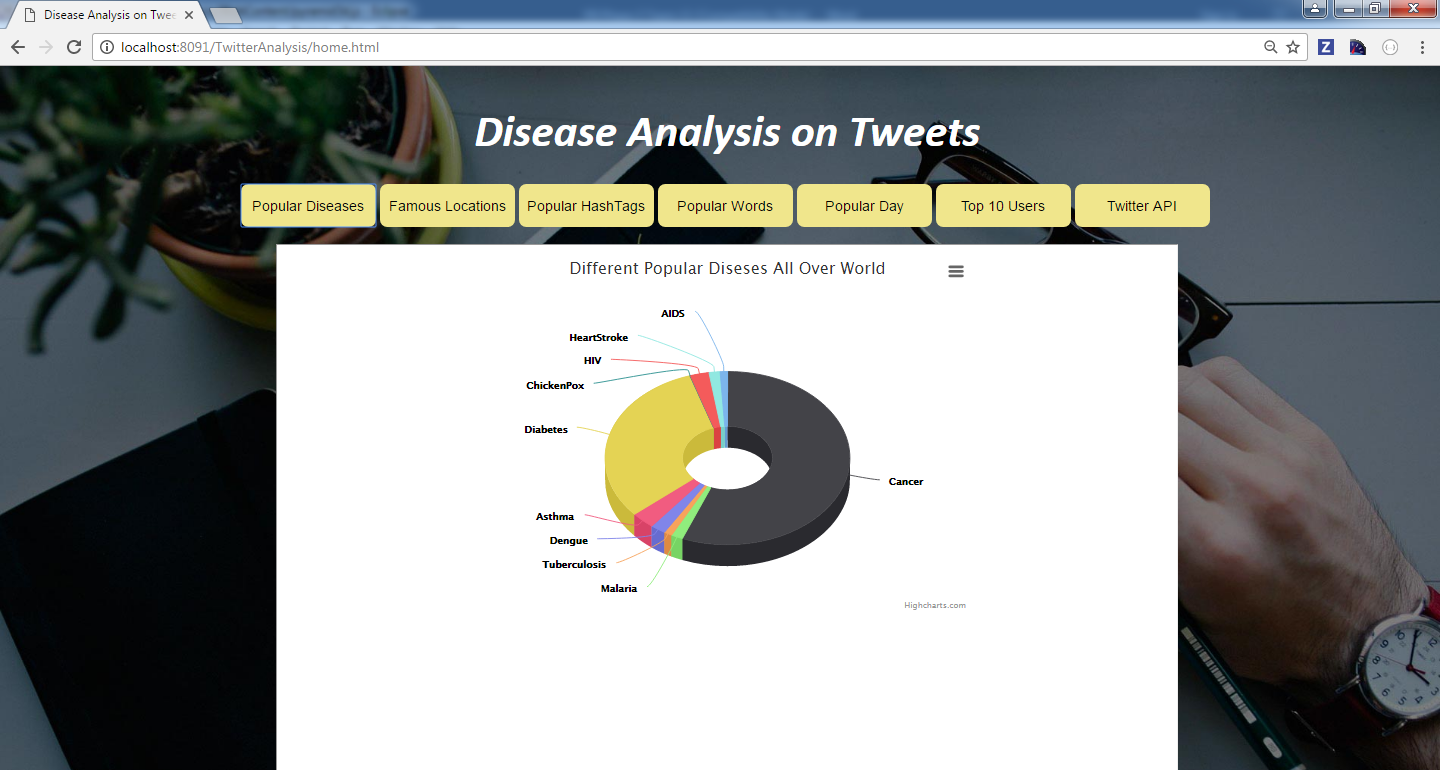
Query 1: Popular Tweets on Different Diseases
In this query, we are fetching the diseases and its tweets count in the file. This query is written using RDD, where we are fetching the count of diseases using hashtags using filter and the count is printed further.
Query 2: Countries that tweeted more on Diseases (Google Maps)
In this query, the top countries that tweeted more on diseases is fetched. First the location in tweets are fetched from tweets file and count is displayed as shown below. The data is stored in .csv format and the file is read and Visualization is done on Google Maps.
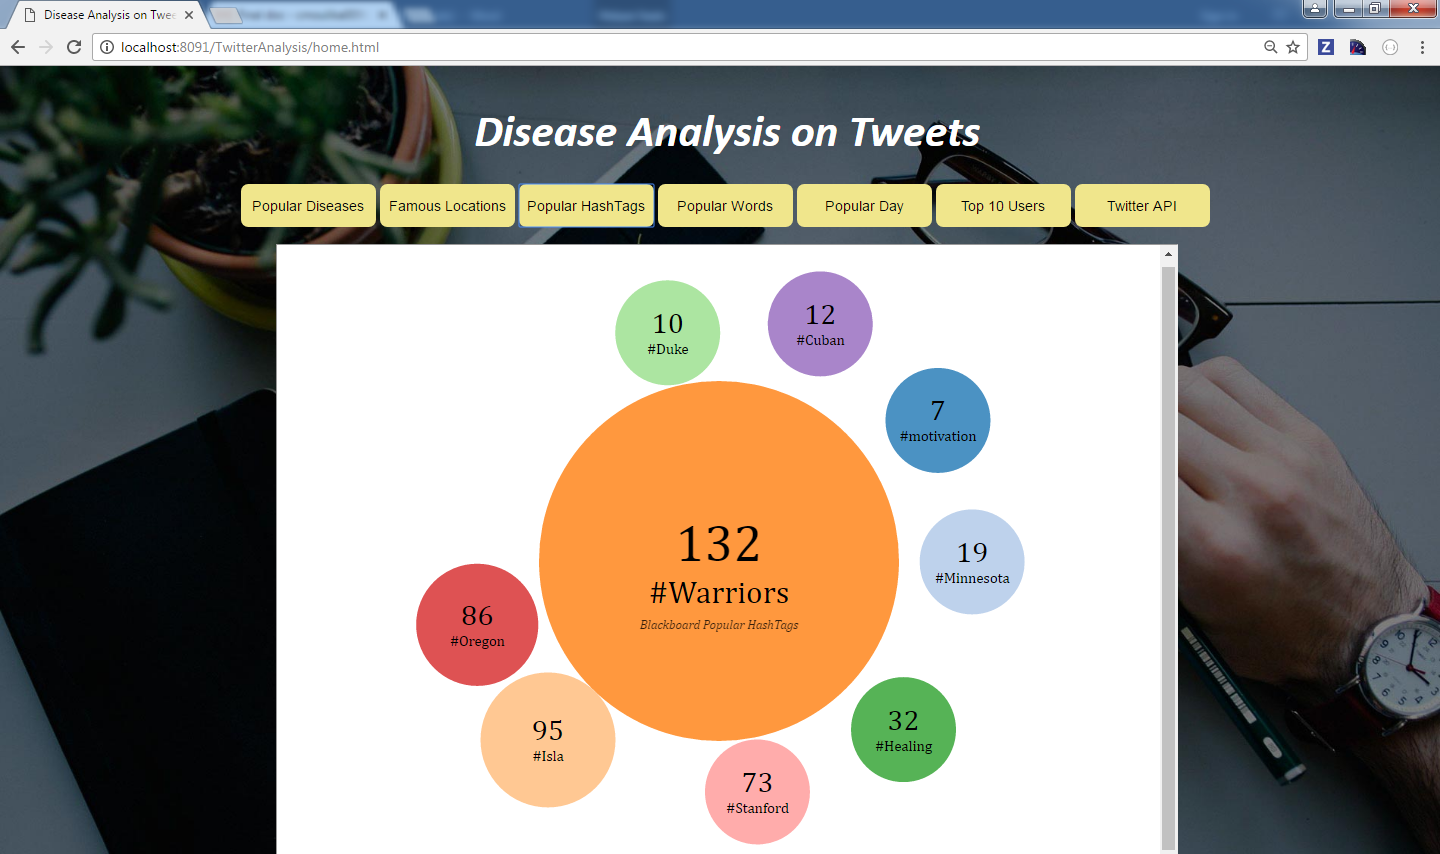
Query 3: Popular Hashtags
In this query, we took popular hash tags text file from blackboard and performed JOIN operation with hash tags from diseases tweets file. The fetched data is stored in .csv format to do visualization.
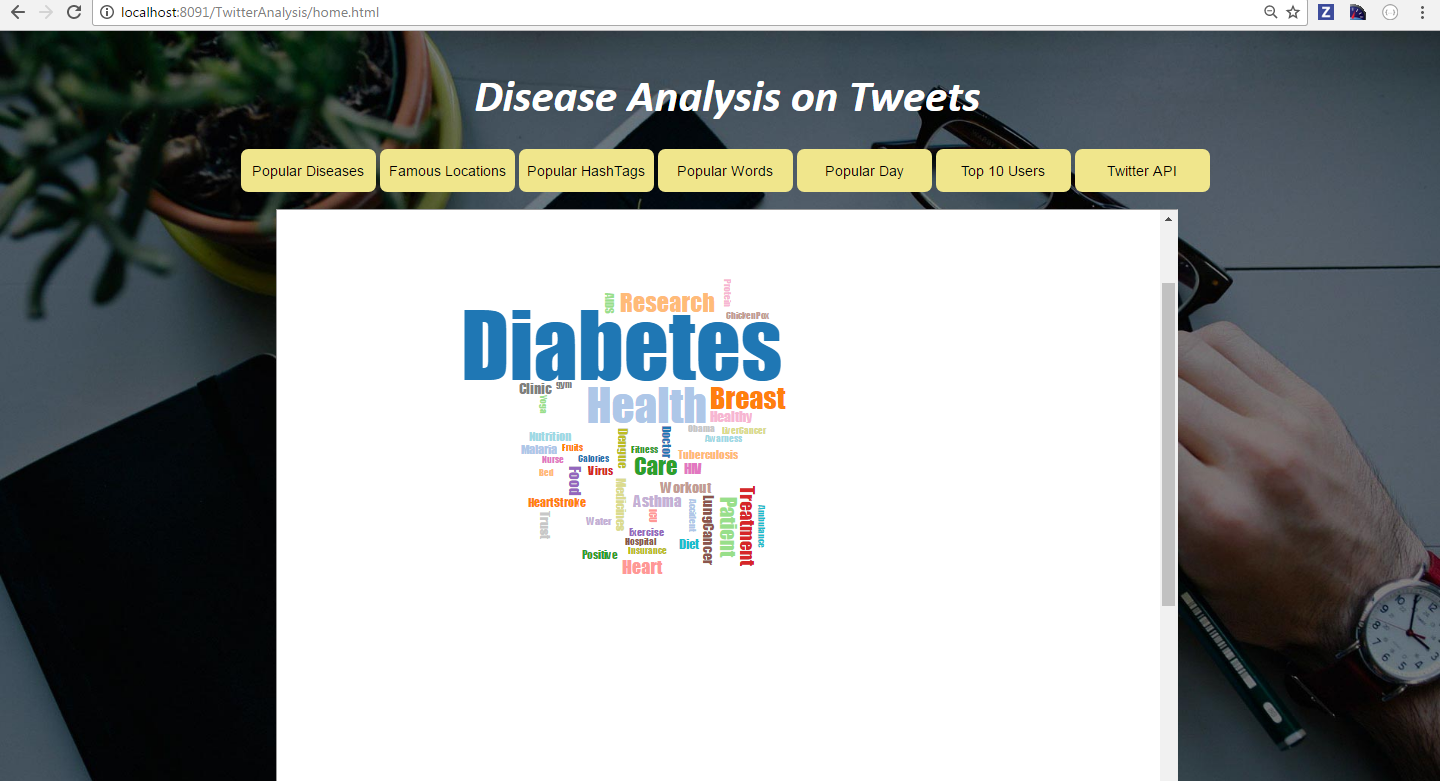
Query 4: Most Popular Tweeted Words
In this query, most occurring words in tweets on diseases is fetched. On the fetched data visualization is done dynamically.
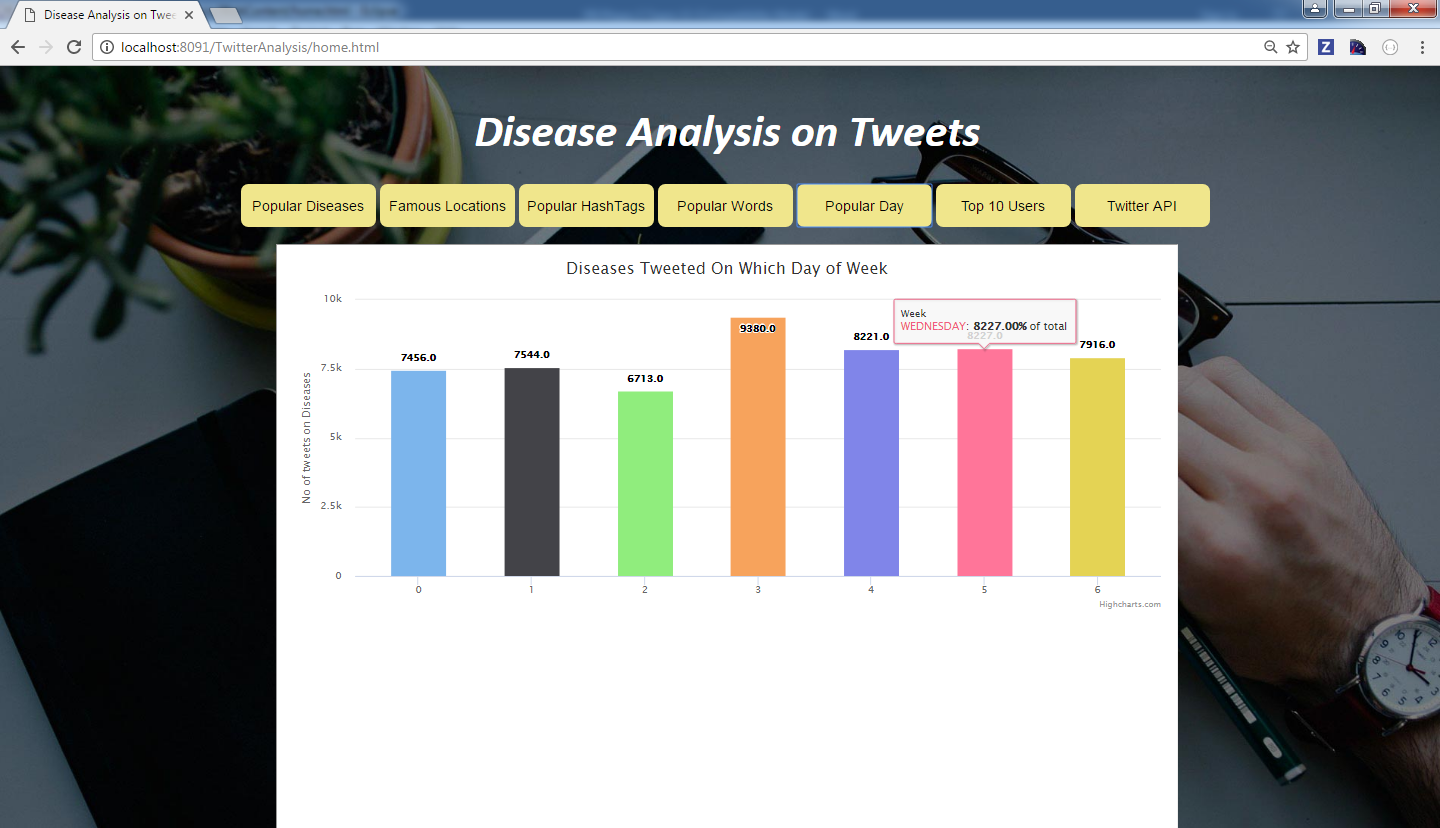
Query 5: On which day of week, more tweets are done on diseases
In this query, data is fetched based on which day of week more tweets are done on Diseases. Initially created_at is fetched from tweets file and count of tweets is done on each day of week.
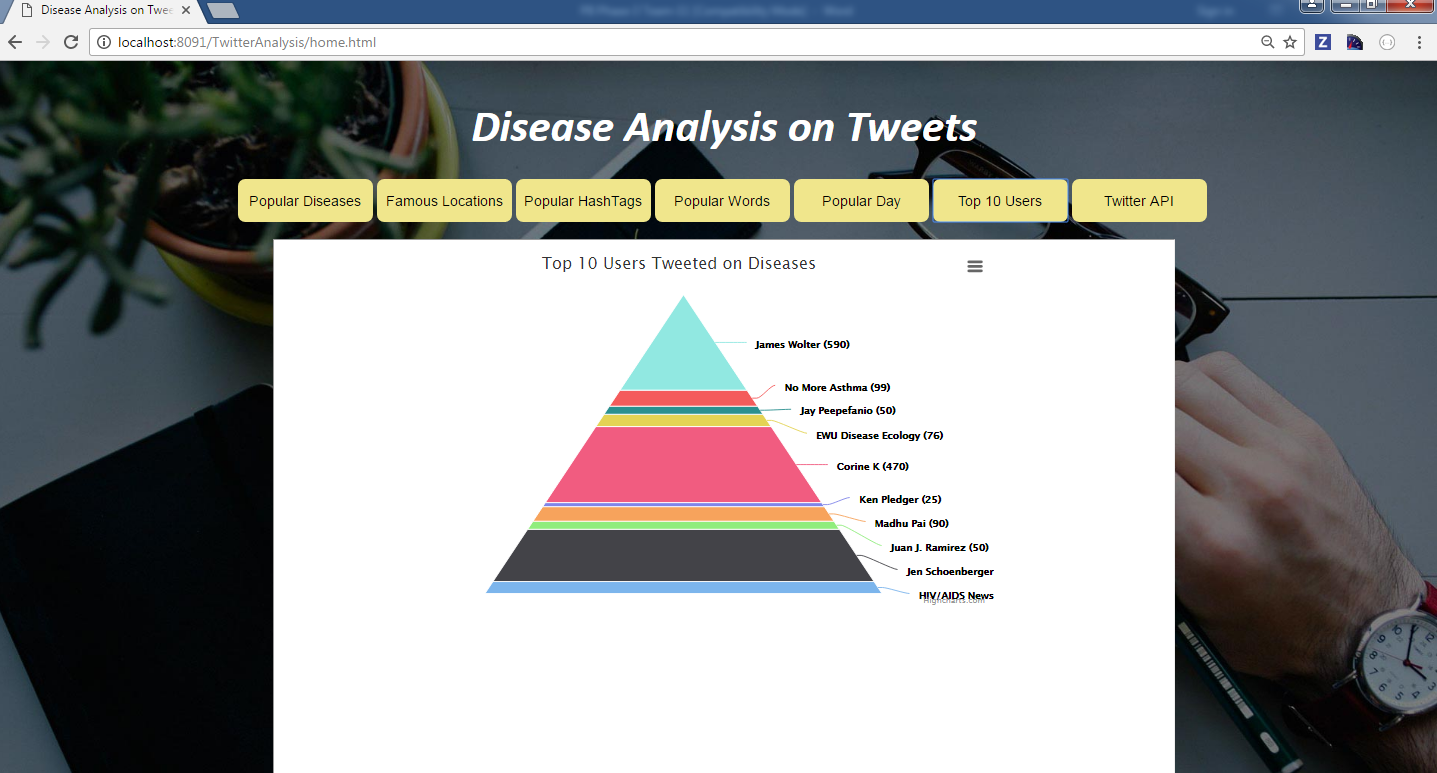
Query 6: Top 10 Users Tweeted on Diseases
In this query the we are fetching top 10 users who tweeted more on diseases. This query is written using RDD. Initially for each disease, the top tweeted user is fetched and UNION RDD is used to club all the diseases. The results are stored in .csv file to do visualization
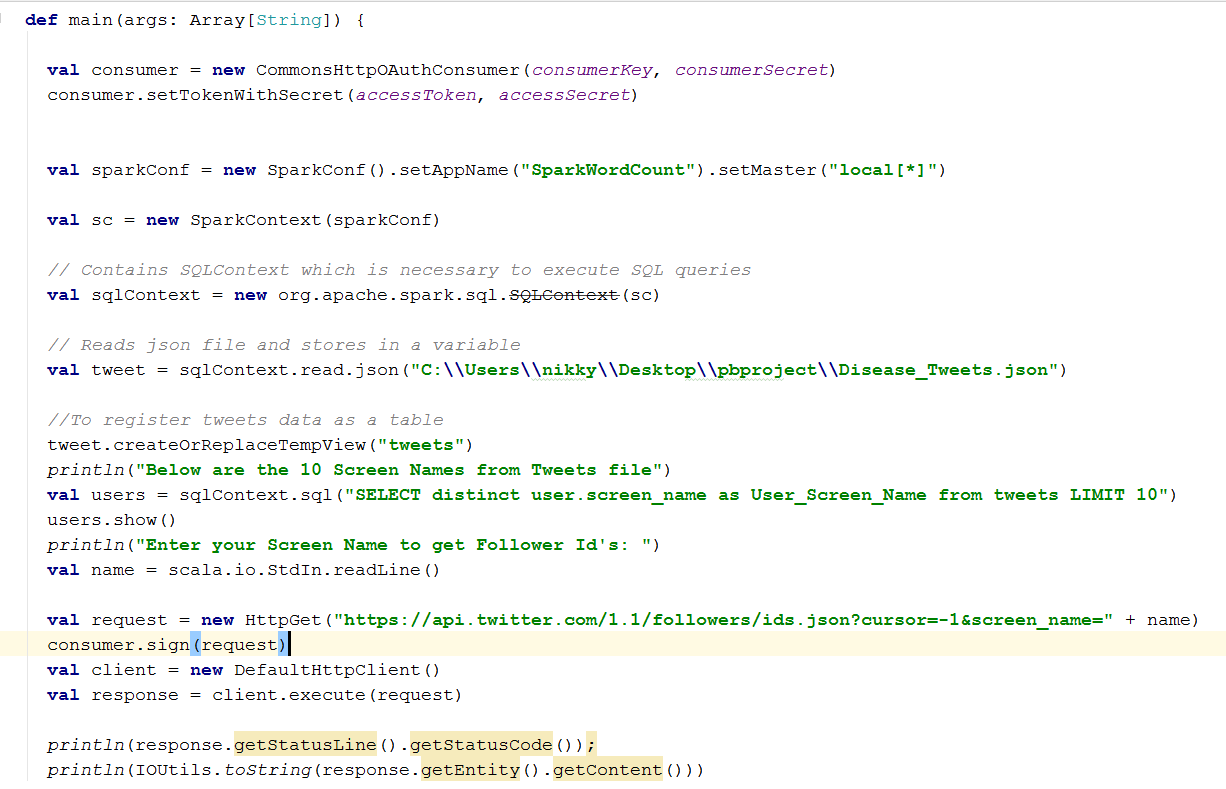
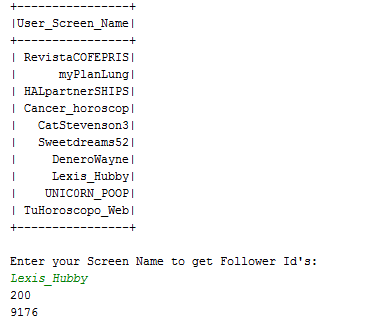
Query 7: Follower Id’s count using Twitter API
Twitter Get Followers ids API is used. A query to display five screen names from the tweets file is written. When the query is executed a table with ten screen names is displayed in the table.
I am no longer activly maintaing this theme, I will try to check out pull requests if possible
hugo-uno
A responsive hugo theme with awesome font’s, charts and light-box galleries, the theme is based on Uno for ghost.
A example site is available at hugouno.fredrikloch.me
A Swedish translation is available in the branch feature/swedish
Usage
The following is a short tutorial on the usage of some features in the theme.
Configuration
To take full advantage of the features in this theme you can add variables to your site config file, the following is the example config from the example site:
languageCode = "en-us"
contentdir = "content"
publishdir = "public"
builddrafts = false
baseurl = "http://fredrikloch.me/"
canonifyurls = true
title = "Fredrik Loch"
author = "Fredrik Loch"
copyright = "This work is licensed under a Creative Commons Attribution-ShareAlike 4.0 International License."


[indexes]
   category = "categories"
   tag = "tags"
[Params]
  AuthorName = "Fredrik"
  github = "Senjindarashiva"
  bitbucket = "floch"
  flickr = "senjin"
  twitter = "senjindarshiva"
  email = "mail@fredrikloch.me"
  description = ""
  cv = "/pages/cv"
  legalnotice = "/pages/legal-notice"
  muut = "fredrikloch"
  linkedin = "fredrikloch"
  cover = "/images/background-cover.jpg"
  logo = "/img/logo-1.jpg"
If you prefer to use discourse replace the “muut” line with the following(remember the trailing slash)
discourse = "http://discourse.yoursite.com/"
If you prefer to use disqus replace the “muut” line with the following
disqus = "disqusUsername"
Charts
To create charts I use Chart.js which can be configured through basic js files. To add a chart to a post use the following short-code:
Cover page
The landing page for Hugo-Uno is a full screen ‘cover’ featuring your avatar, blog title, mini-bio and cover image.
Built with SASS, using BEM
If you know HTML and CSS making modifications to the theme should be super simple.
Responsive
Hugo-Uno looks great on all devices, even those weird phablets that nobody buys.
Moot comments
Moot integration allows users to comment on your posts.
Font-awesome icons
For more information on available icons: font-awesome
No-JS fallback
While JS is widely used, some themes and websites don’t provide fallback for when no JS is available (I’m looking at you Squarespace). If for some weird reason a visitor has JS disabled your blog will still be usable.
In order to develop or make changes to the theme you will need to have the sass compiler and bourbon both installed.
To check installation run the following commands from a terminal and you should see the > cli output but your version numbers may vary.
** SASS **
sass -v
> Sass 3.3.4 (Maptastic Maple)
If for some reason SASS isn’t installed then either follow the instructions from the Sass install page or run bundle install in the project root.
** Bourbon **
bourbon help> Bourbon 3.1.8
If Bourbon isn’t installed follow the installation instructions on the Bourbon website or run bundle install in the project root.
Once installation is verified we will need to go mount the bourbon mixins into the scss folder.
From the project root run bourbon install with the correct path
bourbon install --path static/scss
> bourbon files installed to static/scss/bourbon/
Now that we have the bourbon mixins inside of the scss src folder we can now use the sass cli command to watch the scss files for changes and recompile them.
sass --watch static/scss:static/css
>>>> Sass is watching for changes. Press Ctrl-C to stop.
To minify the css files use the following command in the static folder
curl -X POST -s --data-urlencode 'input@static/css/uno.css' http://cssminifier.com/raw > static/css/uno.min.css
If the login allowed then goes on, but if it did not, then logs the data and raise an error.
For DBA roled users the login is allowed all the time despite the trigger is invalid nor raises an error.
There is a table to controll the logins:
  ORACLE_USER             VARCHAR2 (   400 )
  OS_USER                 VARCHAR2 (   400 )
  IP_ADDRESS              VARCHAR2 (   400 )
  PROGRAM                 VARCHAR2 (   400 )
  ENABLED                 CHAR     (     1 )     Y or N
This table contains the valid user/client/program combinations.
The column values will use with LIKE, so it can be pattern.
i.e. “%” means “every” user/IP address/program e.t.c.
But ‘%’,’%’,’%’,’%’,’Y’ means anybody from anywhere, and this overwrites any other rules!
The refused logon data will be logged into LCL_LOG table.
There is an ENABLED column in the LCL_TABLE too, so you can disabled the logins anytime to set this value to “N”.
The whole solution is not too complicated, so see the install script file for more details!
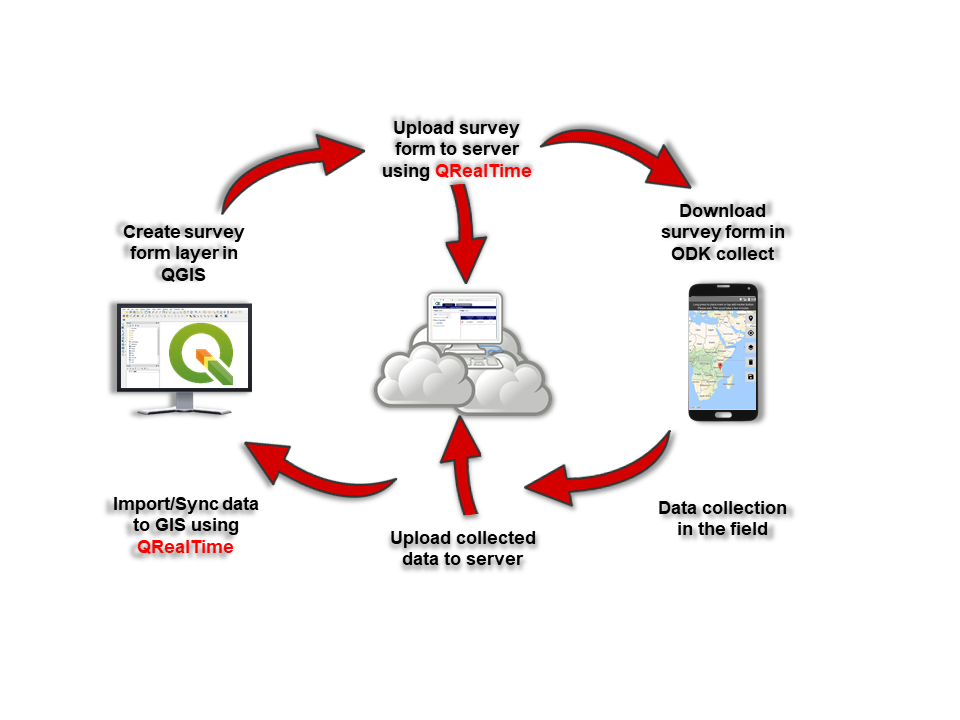
Create new survey form directly from GIS layers in QGIS
Synchronise data from ODK Aggregate, KoboToobox, and ODK Central servers
Import data from server
Getting Started
Installation
Prerequisites:
QGIS installed
Installation steps:
Open Plugin Manager and search for QRealTime plugin and install it.
And restart QGIS so that changes in environment take effect.
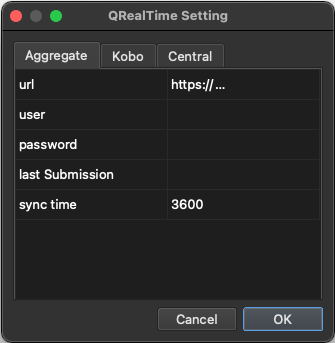
Configuration:
From the main menu choose Plugins –> QRealTime –> QRealTime Setting Here you have three tabs one for Aggregate, KoboToolBox, and Central
Choose one of the tabs and Enter url (required).
For Kobo server url can be:
https://kobo.humanitarianresponse.info/ or https://kf.kobotoolbox.org/ for humanitarian and researcher account respectively
Other fields are optional.
You can create a free account in KoboToolbox here
You can set up ODK Central here
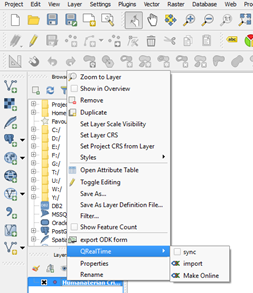
Using the Plugin:
Right click over any existing layer –> QRealTime and choose desired option:
Make Online (to create new form), import (to import data of existing form), sync (to automatically update your layer)
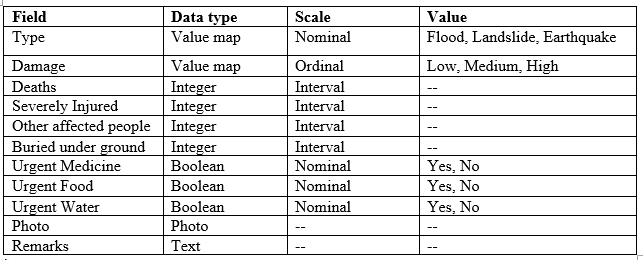
QRealTime plugin is capable of converting QGIS layer into data collection form. To design a data collection form for humanitarian crisis, we have to create appropriate vector layer. For the demonstration purpose, you can create the shapefile with following fields:
Resources:
If you are not sure how to create value map in QGIS, visit this link For a tutorial on how to use the QRealTime Plugin, check out this video :
Hyperledger Fabric sample Using Event Handling with the next generation IBM Blockchain Platform
This code pattern demonstrates leveraging the event handling feature within an application that is based on using an IKS cluster with IBM Blockchain Platform V2.0 service on IBM Cloud. We apply this use case to an auction use case. It shows how events can be emitted by using the Hyperledger Fabric SDK and subscribed to by external applications. The application is implemented in Node.js and is using the Hyperledger Fabric SDK for node.js to connect with the network, set up an event listener and catch transactional events.
A client application may use the Fabric Node.js client to register a “listener” to receive blocks as they are added to the channel ledger. This is known as “channel-based events”, and it allows a client to start to receive blocks from a specific block number, allowing event processing to run normally on blocks that may have been missed. The Fabric Node.js client can also assist client applications by processing the incoming blocks and looking for specific transactions or chaincode events. This allows a client application to be notified of transaction completion or arbitrary chaincode events without having to perform multiple queries or search through the blocks as they are received. After the transaction proposal has been successfully endorsed, and before the transaction message has been successfully broadcasted to the orderer, the application should register a listener to be notified of the event when the transaction achieves finality, which is when the block containing the transaction gets added to the peer’s ledger/blockchain.
Fabric committing peers provides an event stream to publish blocks to registered listeners. A Block gets published whenever the committing peer adds a validated block to the ledger. There are three ways to register a listener to get notified:
register a block listener to get called for every block event. The listener will be passed a fully decoded Block object.
register a transaction listener to get called when the specific transaction by id is committed (discovered inside a published block). The listener will be passed the transaction id, transaction status and block number.
register a chaincode event listener to get called when a specific chaincode event has arrived. The listener is be passed the ChaincodeEvent, block number, transaction id, and transaction status.
In this pattern we are registering a transaction event. So when a transaction is completed/committed – an event will get triggered and the application will catch it and report it.
Audience level : Intermediate Developers
If you have an IBM Cloud Lite account, you can also use the IBM Blockchain Platform Service free for 30 days to do this pattern. Additionally, IKS is free too.
When you have completed this code pattern, you will understand how to:
Package the smart contract using IBM Blockchain Platform Extension for VS Code
Setup a Hyperledger Fabric network on IBM Blockchain Platform 2.0
Install and instantiate smart contract package onto the IBM Blockchain Platform 2.0
Develop a Node.js server with the Hyperledger Fabric SDK to interact with the deployed network and setup your applications to trigger and catch events
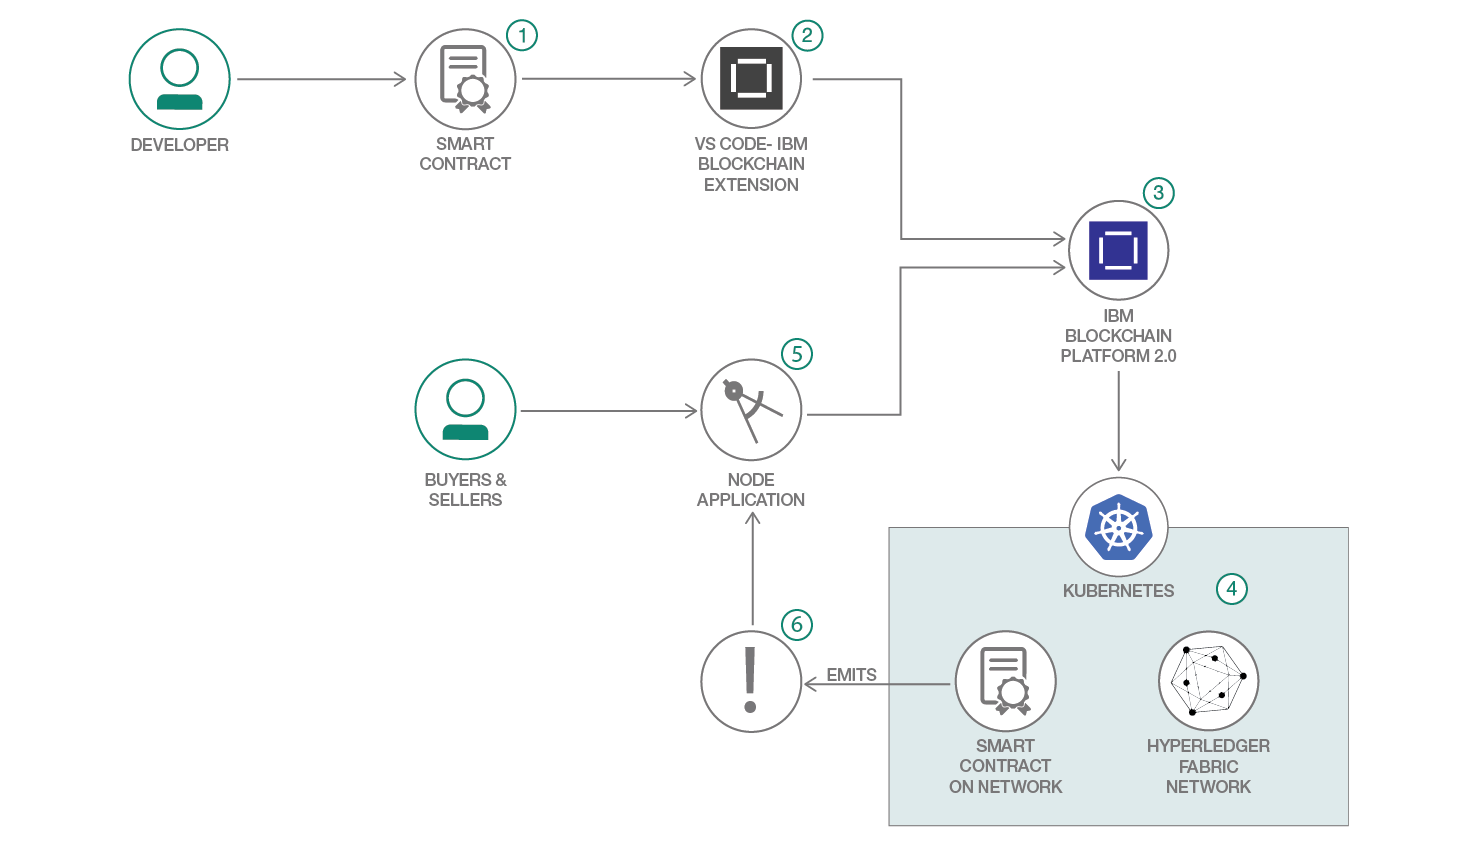
Architecture flow
UPDATE
The developer develops a smart contract using Node.js
Use the IBM Blockchain Platform Extension for VS Code to package the Decentralized Energy smart contract.
Setup and launch the IBM Blockchain Platform 2.0 service
The IBM Blockchain Platform 2.0 enables the creation of a network onto a IBM Kubernetes Service, enabling installation and instantiation of the Auction smart contract on the network
The Node.js application uses the Fabric SDK to add a listener to specific transactions and subsequently interact with the deployed network on IBM Blockchain Platform 2.0 and issues transactions.
Events are emitted as transactions are triggered and blocks are committed to the ledger. The events are sent back to the Node.js application.
Included components
IBM Blockchain Platform 2.0 gives you total control of your blockchain network with a user interface that can simplify and accelerate your journey to deploy and manage blockchain components on the IBM Cloud Kubernetes Service.
IBM Cloud Kubernetes Service creates a cluster of compute hosts and deploys highly available containers. A Kubernetes cluster lets you securely manage the resources that you need to quickly deploy, update, and scale applications.
IBM Blockchain Platform Extension for VS Code is designed to assist users in developing, testing, and deploying smart contracts — including connecting to Hyperledger Fabric environments.
Featured technologies
Hyperledger Fabric v1.4 is a platform for distributed ledger solutions, underpinned by a modular architecture that delivers high degrees of confidentiality, resiliency, flexibility, and scalability.
Node.js is an open source, cross-platform JavaScript run-time environment that executes server-side JavaScript code.
We will use the IBM Blockchain Platform extension to package the smart contract.
Open Visual Studio code and open the contract folder from auction-events that was cloned earlier.
Press the F1 key to see the different VS code options. Choose IBM Blockchain Platform: Package a Smart Contract Project.
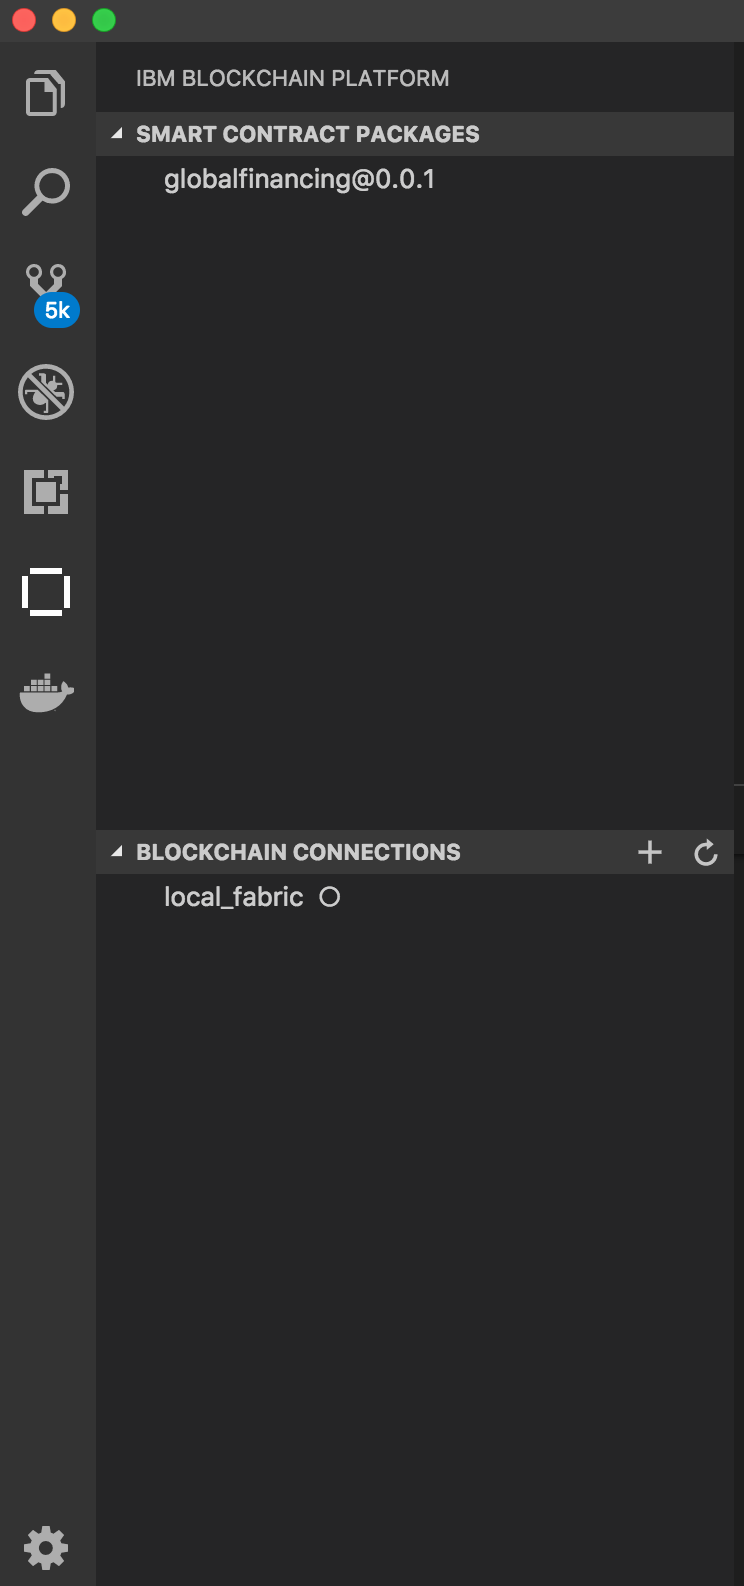
Click the IBM Blockchain Platform extension button on the left. This will show the packaged contracts on top and the blockchain connections on the bottom. Note You will see auction@0.0.1 instead of globalfinancing@1.0.0.
Next, right click on the packaged contract (in this case, select auction@0.0.1) to export it and choose Export Package.
Choose a location on your machine and save .cds file. We will use this packages smart contract later to deploy on the IBM Blockchain Platform 2.0 service.
Now, we will start creating our Hyperledger Fabric network on the IBM Cloud.
3. Create IBM Cloud services
Create the IBM Cloud Kubernetes Service. You can find the service in the Catalog. For this code pattern, we can use the Free cluster, and give it a name. Note, that the IBM Cloud allows one instance of a free cluster and expires after 30 days.
Create the IBM Blockchain Platform 2.0 service on the IBM Cloud. You can find the service in the Catalog, and give a name.
After your kubernetes cluster is up and running, you can deploy your IBM Blockchain Platform on the cluster. The service walks through few steps and finds your cluster on the IBM Cloud to deploy the service on.
Once the Blockchain Platform is deployed on the Kubernetes cluster, you can launch the console to start operating on your blockchain network.
4. Build a network
We will build out the network as provided by the IBM Blockchain Platform documentation. This will include creating a channel with a single peer organization with its own MSP and CA (Certificate Authority), and an orderer organization with its own MSP and CA. We will create the respective identities to deploy peers and operate nodes.
Create your organization and your entry point to your blockchain
Create your peer organization CA
Click Add Certificate Authority.
Click IBM Cloud under Create Certificate Authority and Next.
Give it a Display name of Org1 CA.
Specify an Admin ID of admin and Admin Secret of adminpw.
Use your CA to register identities
Select the Org 1 CA Certificate Authority that we created.
First, we will register an admin for our organization “org1”. Click on the Register User button. Give an Enroll ID of org1admin, and Enroll Secret of org1adminpw. Click Next. Set the Type for this identity as client and select from any of the affiliated organizations from the drop-down list. We will leave the Maximum enrollments and Add Attributes fields blank.
We will repeat the process to create an identity of the peer. Click on the Register User button. Give an Enroll ID of peer1, and Enroll Secret of peer1pw. Click Next. Set the Type for this identity as peer and select from any of the affiliated organizations from the drop-down list. We will leave the Maximum enrollments and Add Attributes fields blank.
Create the peer organization MSP definition
Navigate to the Organizations tab in the left navigation and click Create MSP definition.
Enter the MSP Display name as Org1 MSP and an MSP ID of org1msp.
Under Root Certificate Authority details, specify the peer CA that we created Org1 CA as the root CA for the organization.
Give the Enroll ID and Enroll secret for your organization admin, org1admin and org1adminpw. Then, give the Identity name, Org1 Admin.
Click the Generate button to enroll this identity as the admin of your organization and export the identity to the wallet. Click Export to export the admin certificates to your file system. Finally click Create MSP definition.
Create a peer
On the Nodes page, click Add peer.
Click IBM Cloud under Create a new peer and Next.
Give your peer a Display name of Peer Org1.
On the next screen, select Org1 CA as your Certificate Authority. Then, give the Enroll ID and Enroll secret for the peer identity that you created for your peer, peer1, and peer1pw. Then, select the Administrator Certificate (from MSP), Org1 MSP, from the drop-down list and click Next.
Give the TLS Enroll ID, admin, and TLS Enroll secret, adminpw, the same values are the Enroll ID and Enroll secret that you gave when creating the CA. Leave the TLS CSR hostname blank.
The last side panel will ask you to Associate an identity and make it the admin of your peer. Select your peer admin identity Org1 Admin.
Review the summary and click Add Peer.
Create the node that orders transactions
Create your orderer organization CA
Click Add Certificate Authority.
Click IBM Cloud under Create Certificate Authority and Next.
Give it a unique Display name of Orderer CA.
Specify an Admin ID of admin and Admin Secret of adminpw.
Use your CA to register orderer and orderer admin identities
In the Nodes tab, select the Orderer CA Certificate Authority that we created.
First, we will register an admin for our organization. Click on the Register User button. Give an Enroll ID of ordereradmin, and Enroll Secret of ordereradminpw. Click Next. Set the Type for this identity as client and select from any of the affiliated organizations from the drop-down list. We will leave the Maximum enrollments and Add Attributes fields blank.
We will repeat the process to create an identity of the orderer. Click on the Register User button. Give an Enroll ID of orderer1, and Enroll Secret of orderer1pw. Click Next. Set the Type for this identity as peer and select from any of the affiliated organizations from the drop-down list. We will leave the Maximum enrollments and Add Attributes fields blank.
Create the orderer organization MSP definition
Navigate to the Organizations tab in the left navigation and click Create MSP definition.
Enter the MSP Display name as Orderer MSP and an MSP ID of orderermsp.
Under Root Certificate Authority details, specify the peer CA that we created Orderer CA as the root CA for the organization.
Give the Enroll ID and Enroll secret for your organization admin, ordereradmin and ordereradminpw. Then, give the Identity name, Orderer Admin.
Click the Generate button to enroll this identity as the admin of your organization and export the identity to the wallet. Click Export to export the admin certificates to your file system. Finally click Create MSP definition.
Create an orderer
On the Nodes page, click Add orderer.
Click IBM Cloud and proceed with Next.
Give your peer a Display name of Orderer.
On the next screen, select Orderer CA as your Certificate Authority. Then, give the Enroll ID and Enroll secret for the peer identity that you created for your orderer, orderer1, and orderer1pw. Then, select the Administrator Certificate (from MSP), Orderer MSP, from the drop-down list and click Next.
Give the TLS Enroll ID, admin, and TLS Enroll secret, adminpw, the same values are the Enroll ID and Enroll secret that you gave when creating the CA. Leave the TLS CSR hostname blank.
The last side panel will ask to Associate an identity and make it the admin of your peer. Select your peer admin identity Orderer Admin.
Review the summary and click Add Orderer.
Add organization as Consortium Member on the orderer to transact
Navigate to the Nodes tab, and click on the Orderer that we created.
Under Consortium Members, click Add organization.
From the drop-down list, select Org1 MSP, as this is the MSP that represents the peer’s organization org1.
Click Submit.
Create and join channel
Create the channel
Navigate to the Channels tab in the left navigation.
Click Create channel.
Give the channel a name, mychannel.
Select the orderer you created, Orderer from the orderers drop-down list.
Select the MSP identifying the organization of the channel creator from the drop-down list. This should be Org1 MSP (org1msp).
Associate available identity as Org1 Admin.
Click Add next to your organization. Make your organization an Operator.
Click Create.
Join your peer to the channel
Click Join channel to launch the side panels.
Select your Orderer and click Next.
Enter the name of the channel you just created. mychannel and click Next.
Select which peers you want to join the channel, click Peer Org1 .
Click Submit.
5. Deploy the Auction Event Smart Contract on the network
Install a smart contract (note: substitute the word auction where ever you see the word fabcar in the graphics)
Click the Smart contracts tab to install the smart contract.
Click Install smart contract to upload the Auction smart contract package file, which you packaged earlier using the Visual Studio code extension.
Click on Add file and find your packaged smart contract.
Once the contract is uploaded, click Install.
Instantiate smart contract (note: substitute the word auction where ever you see the word fabcar in the graphics)
On the smart contracts tab, find the smart contract from the list installed on your peers and click Instantiate from the overflow menu on the right side of the row.
On the side panel that opens, select the channel, mychannel to instantiate the smart contract on. Click Next.
Select the organization members to be included in the policy, org1msp. Click Next.
Give Function name of instantiate and leave Arguments blank. Note:instantiate is the method in the my-contract.js file that initiates the smart contracts on the peer. Some may name this initLedger.
Click Instantiate.
6. Connect application to the network
Connect with sdk through connection profile (note: substitute the word auction where ever you see the word fabcar in the graphics)
Under the Instantiated Smart Contract, click on Connect with SDK from the overflow menu on the right side of the row.
Choose from the dropdown for MSP for connection, org1msp.
Choose from Certificate Authority dropdown, Org1 CA.
Download the connection profile by scrolling down and clicking Download Connection Profile. This will download the connection json which we will use soon to establish connection.
You can click Close once the download completes.
Create an application admin
Go to the Nodes tab on the left bar, and under Certificate Authorities, choose your organization CA, Org1 CA.
Click on Register user.
Give an Enroll ID and Enroll Secret to administer your application users, app-admin and app-adminpw.
Choose client as Type and any organization for affiliation. We can pick org1 to be consistent.
You can leave the Maximum enrollments blank.
Under Attributes, click on Add attribute. Give attribute as hf.Registrar.Roles = *. This will allow this identity to act as registrar and issues identities for our app. Click Add-attribute.
The enroll id and enroll secret for your app admin, which we earlier provided as app-admin and app-adminpw.
The orgMSP ID, which we provided as org1msp.
The caName, which can be found in your connection json file under “organization” -> “org1msp” -> certificateAuthorities”. This would be like an IP address and a port.
The peer, , which can be found in your connection json file under “organization” -> “org1msp” -> peers”. This would be like an IP address and a port.
The username you would like to register.
Update gateway discovery to { enabled: true, asLocalhost: false } to connect to IBP.
First, navigate to the application directory, and install the node dependencies.
cd application
npm install
Run the enrollAdmin.js script
node enrollAdmin.js
This will create a directory called wallet and insert the user Admin along with its certificate authority.
You should see the following in the terminal:
msg: Successfully enrolled admin user app-admin and imported it into the wallet
In the newest version of the Hyperledger Fabric Node SDK (1.4 release) there are
three main event types that can be subscribed to
Contract events – these have to be emitted from the chaincode by calling the
stub.setEvent(name,payload) method. An example can be seen
in the auction chaincode on line 141 of contract/lib/auction.js. These types of
events are great, since you can customize exactly what data you want to send
to the client application. Note that these events will only be triggered once
a certain function within your chaincode is called.
Transaction (Commit) events – these are automatically emitted
after a transaction is committed to the ledger.
Block events – these are emitted automatically when a block is committed.
Note that there can be mutliple transactions in a block, so you may get multiple
transaction events for one block event.
8. Emit Contract Events
To illustrate each of these three main event types, we will have a separate script
for each, that will show each of the events in action. First, let’s check out the
contractEvents.js file. This file uses the addContractListener function to
look for any TradeEvent events that may be published from our chaincode. You can
see in our contract directory, that our StartBidding, Offer, and CloseBidding
functions all emit an event my calling await ctx.stub.setEvent('TradeEvent', Buffer.from(JSON.stringify(tradeEvent))); Then, our callback function in our contractEvents.js
file will fire once it has
detected that the TradeEvent is sent. Go ahead and run contractEvents.js by
typing in the following command in terminal
This above output parses the trade event – it shows us the type of the event, the owner, the id,
the description of the product the status, etc. This is all things we have built and emitted within
our chaincode. Great. Now that we understand how contract events work, let’s move onto the block
event listener.
9. Emit Block Events
Block events are different than contract events since you have less control of what exactly
is being output. Go ahead and check out blockEvents.js. Note that there may be multiple
transactions within one block, and you can edit how many transactions are in your block by
editing the block batch size for a channel. You can read more details about this
here.
The main components of the block are the block header, the block data, and the block
metadata.
The block header contains the block number, (starting at 0 from the genesis block)
and increased by 1 for every new block appended to the blockchain. It also has
the current block hash (the hash of all transactions in the current block), and
the previous block hash.
The block data contains a list of the transactions in order.
The block metadata contains the time when the block was written,
the certificate, public key and signature of the block writer.
Go ahead and run the blockEvents.js script by typing in the following
commands in the terminal. For each contract.submitTransaction we submit,
we will have a new block added to the ledger.
Notice the output will be divided by header,
data, and metadata. You can then parse those respective parts of the output
to learn more about each specific part of the block.
To learn more about the specifics of what is included inside of a block, read this
page.
10. Emit Transaction Events
Lastly, let’s go ahead and listen for transaction events. This is even more
granular than block events, since multiple transactions can comprise a block.
We will use the transaction.addCommitListener to listen to transactions. Go
ahead and look at the transactionEvents.js file. What we are doing, is that we are
adding a committ listener, such that when we submit a transaction, and it is
committed, we will get the transactionId, status, and blockheight back. Go
ahead and run transactionEvents.js file, and you should see the following
output in your terminal:
If you receive the following error on submitting transaction:
error: [Client.js]: Channel not found for name mychannel
It is safe to ignore this error because the ibp2.0 beta has service discovery enabled. (In order to use service discovery to find other peers please define anchor peers for your channel in the ui). If you really want the message to go away you can add the channels section to the connection profile, but it is a warning rather than a true error telling the user the channel is found but not in the connection profile
As an example you can manually add the following json and updated the IP address and ports manually:
In the invoke-emit.js application, you will see the following code:
It is important to note that in order for the getClient method to actually get the connection.profile content, you need to have line #4 occur before line #6. If you don’t, then the client constant will be null. It is important you have the order correct to run the code successfully.
1. // A gateway defines the peers used to access Fabric networks

2.    await gateway.connect(ccp, { wallet, identity: appAdmin , discovery: {enabled: true, asLocalhost:false }});
3.    console.log('Connected to Fabric gateway.');

4.   const network = await gateway.getNetwork(channelName);
5.    // Get addressability to network

6.    const client = gateway.getClient();

7.    const channel = client.getChannel('mychannel');
8.    console.log('Got addressability to channel');

9.    const channel_event_hub = channel.getChannelEventHub('173.193.79.114:30324');
Extending the code pattern
This application can be expanded in a couple of ways:
Create a wallet for every member and use the member’s wallet to interact with the application.
Add a UI application in place of the invoke.js node application to execute the transactions.
This code pattern is licensed under the Apache Software License, Version 2. Separate third-party code objects invoked within this code pattern are licensed by their respective providers pursuant to their own separate licenses. Contributions are subject to the Developer Certificate of Origin, Version 1.1 (DCO) and the Apache Software License, Version 2.